
Growing shrubs from hardwood cuttings is one of the simplest and most inexpensive ways to propagate shrubs.

Most people call them sticks. But to us growers they are much more magical. These “sticks” are hardwood cuttings and it is one of the most inexpensive, and simplest ways to grow shrubs.
To get a hardwood cutting, you simply prune off a branch (known as a cutting) from a dormant shrub in your landscape. From there, you stick that cutting into a growing media, and wait for it to root. When it roots, you will have a baby shrub that is a genetic clone of the shrub it came from.
It’s amazing that you can grow a shrub that would normally cost you $45 at a nursery, for free, at home, with not much more than a stick!
Growing shrubs from hardwood cuttings boils down to 6 simple steps.
Step 1 Collect Hardwood Cuttings
Decide which shrubs you want to take cuttings from. Your own landscape is a great place to start. Also, don’t be afraid to ask a neighbor if you can take some cuttings from a few shrubs. You want to wait until the winter months when the plant you are taking cuttings from is dormant. This is when the soft, green growth that grew this past spring has become a hard, woody stem.
Some plants are easy to grow from hardwood cuttings, and some are not.
Here’s a quick list of hardwood cuttings that are relatively easy to grow: Forsythia, Red Twig Dogwood, Yellow Twig Dogwood, Most Hydrangeas especially Annabelle, Ninebark, Purple Sandcherry, Willows, Spirea, Weigela, Rose of Sharon, Blueberries, and Grapes. Don’t be afraid to experiment, its not really costing you anything.
Take a look at the picture below. This is me taking hardwood cuttings from a row of Red Twig Dogwood shrubs I have along my driveway.
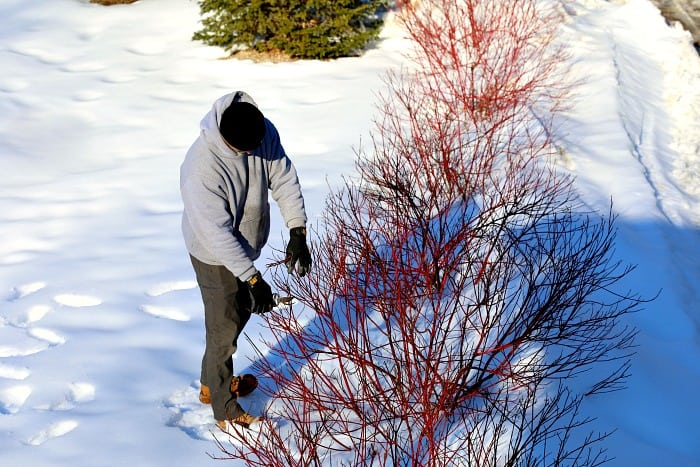
I am pruning long stems off and will sort them out and prune them correctly in a bit. But for now, I am just going around pruning and gathering stems.
I’m not just taking the top part which is this past years growth, I am going deeper into the shrub so I have some stems that were produced two or more years ago as well. I actually prefer these thicker cuttings, which are about as thick as a pencil.
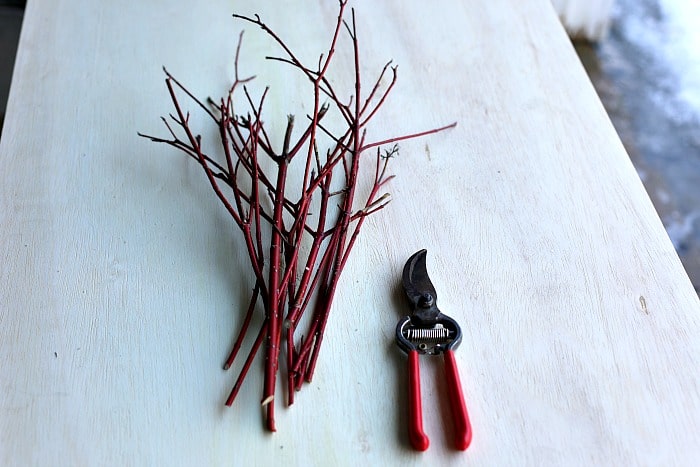
After I gather a bunch of cuttings, I take them into my garage where I will be pruning them the correct way, and preparing them to be stuck in a good hardwood cutting mix.
Step 2 Pruning
Ok, you’ve got a bunch of “sticks”. Now what?
You want to sort through each one and make some pretty specific cuts with your pruners. A good pair of bypass pruners is strongly recommended.
First off, make sure you have the cuttings right side up.
This is important because you are going to prune the bottom portion of the cutting and the top part differently.
For the bottom portion you want to cut right below the node at a slight angle, but not cutting the actual node itself. Take a look below.
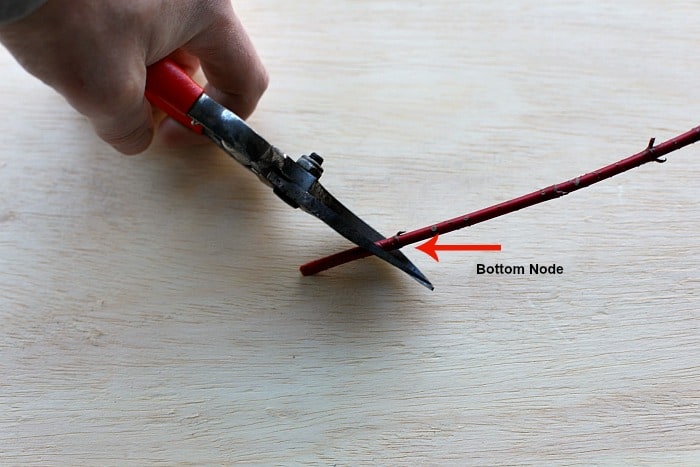
The future roots of this cutting will grow from either this bottom node or from the very bottom of the cutting, or both (depending on the shrub).
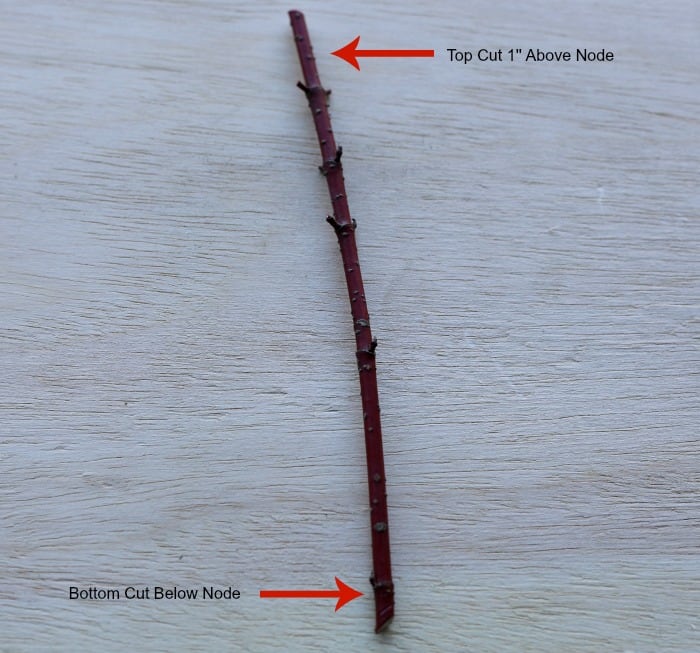
Next, you want to cut the top part of the cutting. Make sure the whole cutting is at least 5’’ in length, but as a rule you at least have to go to above the next node.
The cutting will die back to the nearest node, but on the top portion of the cutting it’s good to leave an extra inch or two.
Even though this top portion will eventually die back to the nearest node, it’s good to leave it longer because it helps protect the node from frost. It also helps to identify the top of the cutting from the bottom when sticking the cuttings.
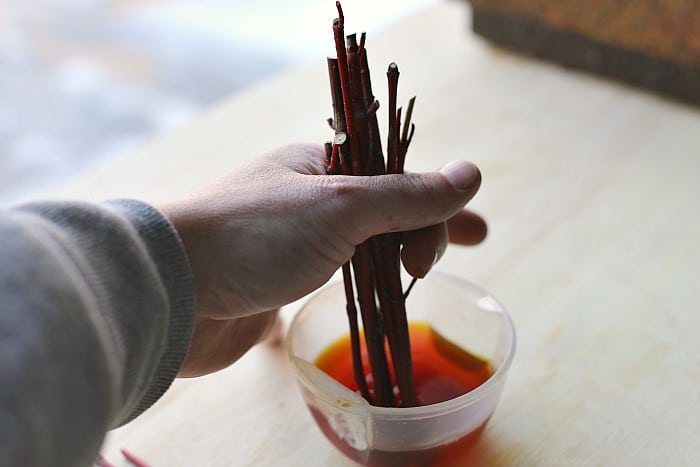
Step 3 Dip In Rooting Hormone
After pruning your cuttings it’s a good idea to dip the bottom couple inches into rooting hormone.
I use this liquid hormone and leave the bottom couple inches of the cuttings in for about 5 seconds as seen below.
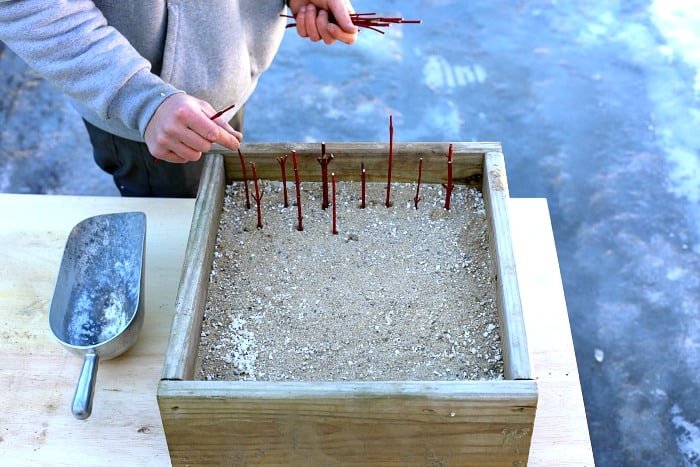
Step 4 Stick Your Hardwood Cuttings
You’ve got your hardwood cuttings all pruned and dipped in rooting hormone. It’s time to stick your cuttings!
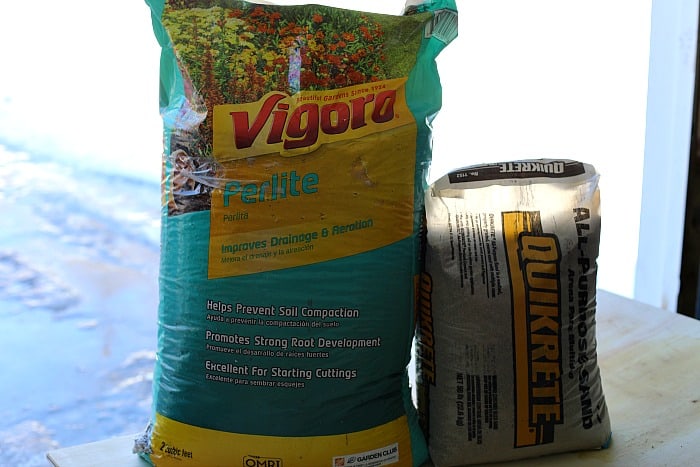
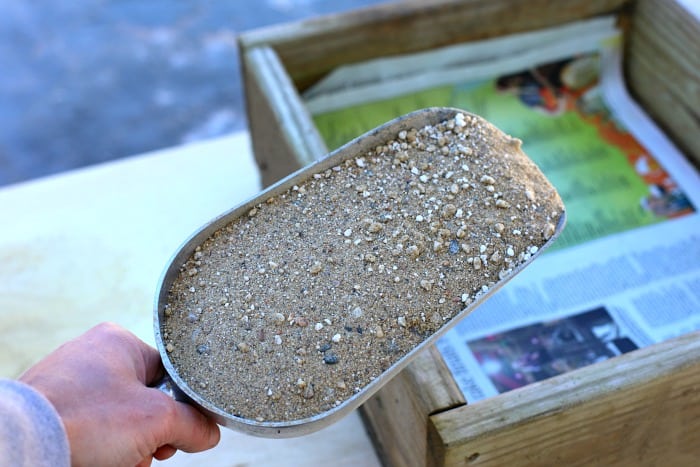
There are some different options here, but personally, I like to use a mixture of coarse sand and perlite.
Coarse sand has small stones and pebbles in it. It is not washed sand that masons use in their mortar mix. Quickrete makes a good all purpose sand that is a great choice for coarse sand.
The key here is drainage. Your cuttings are going to be kept outside in the snow and rain so you want to make sure you have good drainage.
I like to take about 75% coarse sand and 25% perlite for added drainage and mix it together.
Pour the Coarse Sand/Perlite Mixture into a container with drainage holes at the bottom.
Pretty much anything that is lightweight, can support the mixture, and has drainage holes at the bottom will work. I use a mixture of wooden boxes that I’ve made from decking, plastic containers, and even nursery containers.
The trick is to use a layer or two of newspaper at the bottom of your container to keep the sand/perlite mixture from leaking out the bottom where the drainage holes are.
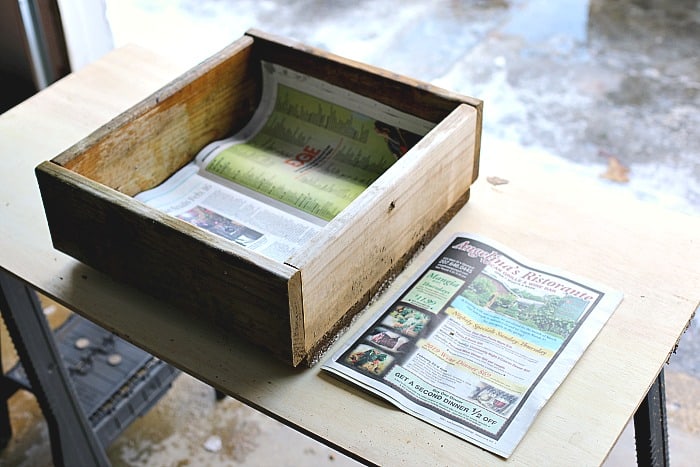
Don’t worry about the newspaper eventually deteriorating. By that time your cuttings should have plenty of roots to keep the sand and perlite from leaking out.
Once the newspaper is down, fill the container with your coarse sand/perlite mix.
Once you have your mix in your containers, simply stick in your cuttings. Make sure the bottom node is completely in the mix.
After you’re done sticking your cuttings you want to give them a light watering. The cuttings don’t really need water at this time, it’s just to get the sand/perlite compacted around the cuttings.
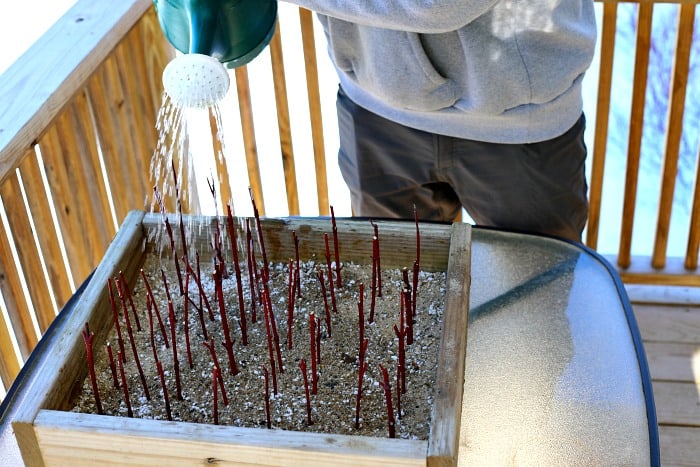
After the cuttings get watered your final step for now is to put them outside! It really is that simple.
I leave my cuttings outside so the winter snow can dump on them. If anything, I try and protect them from the wind, but that’s about it.
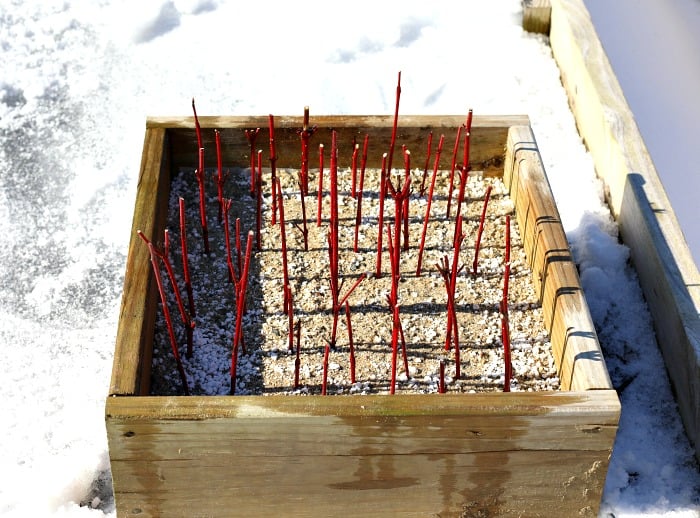
Remember, these hardwood cuttings are all dormant, so don’t expect anything to happen until the spring. All that’s happening at this point is the buried cut end will callus over for the next several weeks.
Now is a good time to get into your head that you will have plenty of losses.
A 50% success rate is considered good for hardwood cuttings. Don’t worry about the losses, this is an inexpensive method for growing shrubs and with that comes losses.
Step 5 Remove Cuttings from Growing Media
With a little bit of luck, most of the hardwood cuttings will start to leaf out in the spring and eventually roots will form out the bottom where you made your cut, and in some cases, roots will grow where the bottom node is.
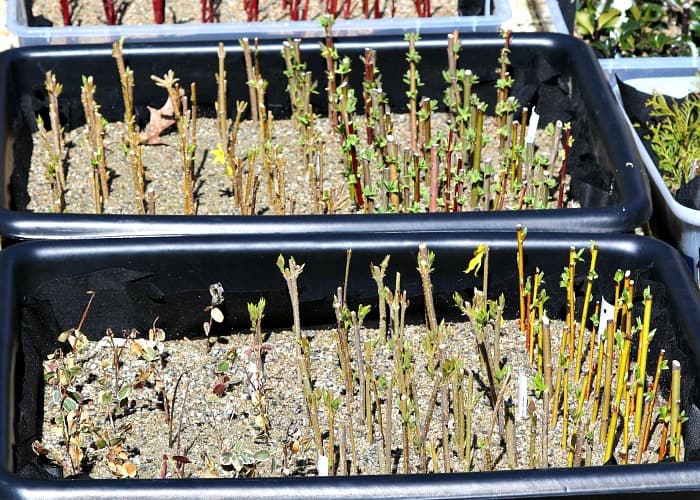
It is important in the spring to be patient!
Give the hardwood cuttings plenty of time to get a decent root structure. Just because a plant is putting on new growth doesn’t mean that it has good roots. Sometimes a cutting can leaf out without any roots at all!
A good test to see if a cutting is rooted enough to be potted up is to simply give it the pull test. Take a couple of cuttings and gently try to pull them out of the sand mix. If there are roots then it will be difficult to remove the cutting.
How Long Do Hardwood Cuttings Take to Root?
Some cuttings, such as Annabelle Hydrangea will be ready to be potted up in as soon as 5 weeks when the weather breaks in the spring. Most other cuttings will take longer and won’t be ready to pot up until late summer.
If removing cuttings from the sand at this time just remember that you need to be very gentle. This plant is actively growing so ripping the roots apart will likely kill it.
I find the best way to remove the cuttings from the sand is to gently dump out the container it is in and finger through the cuttings to separate them. You can also try using a big spatula to try and scoop underneath the roots and lift the cuttings out.
Step 6 Potting Up Hardwood Cuttings
Correctly potting up a bare root hardwood cutting is a little different than potting up a plug or liner that has potting mix still attached to its roots. Incorrect potting methods will likely cause massive losses.
Growing plants from hardwood cuttings is a simple and extremely affordable way to grow a ton of shrubs. Don’t be afraid to experiment with different shrub species and different rooting medias.
If you’re starting a backyard nursery and are having trouble getting your hands on hardwood cuttings, don’t worry, there are plenty other ways to build your plant inventory. My favorite and most used is the buy and grow method.
For perennials I highly recommend starting seeds indoors. Not only is this a cheap way to grow tons of plants, but it also allows you to garden during the winter!
Check Out These Posts Next
Best Perennials to Grow from Seed
Winter Sowing: Open Pot Method
Follow Me
Join my free email list!
Plus, follow me on Facebook, Instagram, and Pinterest.
Good information and nicely presented with images. I would like to know if you have any direct experience with elderberries or arnonia/ black chokeberry (Aronia melanocarpa)? I have planting beds with both, and I will transplant quite a few into the field next spring. However, I am interested in trying dozens of cuttings with my elders and possibly hundreds with aronia. Thank you!
I have successfully propagated a couple of dozen Elderberries using the same hardwood cutting technique. Just wait until plant is dormant and follow the typical hardwood cutting steps. I have never propagated Aronia but I think it would be worth experimenting with the same system. You could also take some dormant cuttings in early spring and place the bottoms in water with a rooting hormone. The roots will grow in the water and you can transplant into a pot. I’ve seen people do this very successfully with Aronia.
I think I will try both according to the guidelines you recommend, but also do some in water to be able to more closely track the progress. Thanks and best to you!
This is so helpful, Mark. My parents have overgrown hardwood shrubs in their yard. I have a newly purchased house with minimal landscaping and I honestly cannot afford to buy all new nursery shrubs this year. The steps you have have provided are clear and the pictures depicting the nodes and where to trim is beyond helpful. I cannot wait to try these steps and the best part is that I won’t lose anything by giving this a try! There’s so much to gain if it works! Great info here for sure!
I’m so happy to hear you found this helpful Collin! It’s amazing how you can grow expensive shrubs for practically free. Good luck and thanks so much for commenting!
Per your instructions I have about 30 twigs in sand on my front deck. Hoping 50% success. Just a way to keep gardening during winter.
I’m wondering if you ever dud winter sowing of iris seeds. I’m getting ready to do them in this next week. I’m in Wisconsin so we have plenty of winter left.
If you have any suggestions in the next 7 days I’d sure appreciate it. I have 4 varieties. Never grown from seeds, only rhizomes…another winter experiment. Guess if iris can start from seed they need stratification and light?
Hi Clynn! Happy to hear you’ve got some cuttings in sand. As for the iris seeds I think it’s definitely worth giving them a shot using the winter sowing method: Winter Sowing In Milk Jugs. They do need a cold treatment period so I would put them right outside in the cold Wisconsin weather. Also, I’d cover the seeds a little bit so that they are covered with about 1/2″ of potting mix. With any luck you’ll have some of them germinate around the same time that irises start emerging from the ground.
Hi Mark! Thanks for these great steps! I have a question about evergreens and conifers. What do recommend on starting these from seed and / or cutting? I have Virginia & white pines, deodar cedars, & American holly growing in my woods, I’d like to propagate and fill out other areas of my yard for privacy and screen eventually. Zone 7b upstate SC. Thanks!
Hi Kim! I would try all those with hardwood cutting propagation. I’ve successfully done white pines and American holly. They’re not the easiest though so you should take a lot of cuttings to get a good success rate. I’ve found that in general with evergreen cuttings you’re best sticking them in some potting mix with coarse sand, about a 50/50 mix. This will allow the cuttings to be in a little bit more moisture which I’ve found to be beneficial. Also take cuttings from younger, healthy plants. White Pines for example lose the ability to regenerate once they get older. Keep these cuttings protected from direct sun and don’t let them dry out.
Thank you! One follow up? Any recommendations on using deodar seeds or cones to sew?
I’ve successfully grown conifers in the past that I’ve started from seed. In the fall collect the cones when they are still closed. Bring them inside where it is warm and they will eventually open. This could take a little while (days or weeks). Once they open you should be able to turn the cone upside down and lightly bang it on a hard surface to get the seeds to fall out of the scales. Then, place the seeds in moist sand in a plastic bag and put them in your refrigerator for at least 2 months. They need this cold stratification period. After that you should be able to sow them in potting mix. I would find a protected area in your yard where you can expose them to light but not too much.
Hi found your post and I’m now following! One question. What type of sunlight should cuttings have while rotting takes place? I live in coastal texas Zane 8 B/C.. Thanks
Hi Sarah! Definitely keep them out of the sun. I usually grow in what I would call Part Shade.
This is so informative, Mark. I feel like I’ve cheated the system somehow by making my own shrubs from just sticks! LOL! Thanks again!
You’re very welcome Steve! I know what you mean, it’s kind of like magic! Thanks for taking the time to leave a comment!
Hi. Just wondering if a peony can be done with this method? I have the yellow B.
Hi Sandra, for Peonies I’d do it slightly different. Instead of taking a dormant hardwood cutting, I’d take more of a semi hard cutting in late summer. Then I’d put the cuttings in rooting compound, then in coarse sand similar to the process I described. After that I would setup a way to keep the sand moist throughout the day for several weeks (mist). If you’re just doing a couple of cuttings you can put each cutting in a small pot, filled with sand, and wrap the small pot in a plastic bag. With a spritzer, spritz the top of the soil and the inside of the bag with water once a day, then seal the bag. This should keep the soil nice and moist.