
Creating a landscape bed can be intimidating for most homeowners. Use this simple step by step process to create a landscape bed and choose the right plants. You’ll also learn some design tips to help you plant along your house.
1. Layout Landscape Bed
Make a rough sketch of the area you want to plant. Start with existing features. In this example below I drew my house and walkway since those areas are remaining unchanged. Don’t worry about making this to scale.
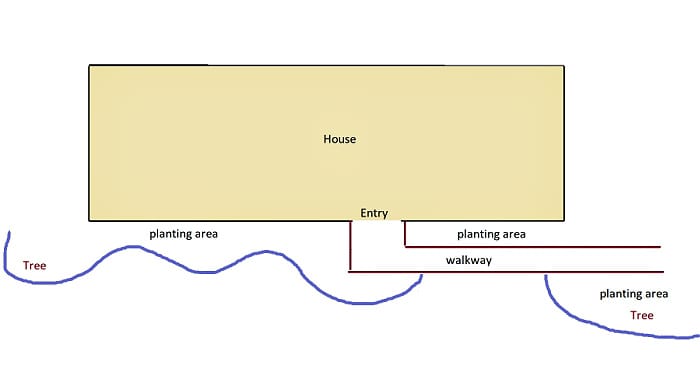
After existing features are drawn, experiment with laying out the general shape of the landscape beds you want to install. Choose between curved borders or straight borders. If planting along the house (also know as foundation planting) then extend the landscape beds beyond the corners of the house as seen above. This helps frame the house and will make it look bigger.
In this step I don’t get too crazy thinking about specific plant species. At most, I’ll call out where I want to put some trees or larger shrubs to frame in the house.
2. Create Edge and Remove Grass
Once you have a rough idea on paper, go out and use a garden hose (if curved) or string (if straight) to layout the edge of the landscape bed. Take your time and make sure you get a layout you are happy with. If you’re laying out a curved bed you want the curves to be large and smooth. Avoid choppiness that you get from small curves.
If laying out a line, make it parallel to the house, porch, patio, or whatever other hardscaped surface you are planting in front of.
Once you’re happy with the overall shape of the bed it’s time to cut in the edge. I have an easy to follow tutorial on creating perfect landscape edges here: How to Edge a Garden
If you are creating this bed in an area where there is grass then it’s best to remove the grass over the entire area. If the area is small enough you can do this with a flat edging shovel but for a larger area I’d recommend using a sod cutter.
If you really didn’t feel like doing the work of removing the existing grass you could spray the area with a non selective herbicide such as Roundup. This should be done at least a couple of weeks before installing your landscape bed so the grass has time to die. If using this method then adding a thick layer of compost as described in the next step is very encouraged. Chances are you’ll have to dig through the grass layer when digging in your plants so just make sure you dig a wide hole and add compost inside the hole to help the plant get established.
3. Add Compost
This step is optional but it does make a big difference. I like to build up my landscape beds so they don’t lay flat. By mounding up compost several inches thick it makes much more of a visual impact. You can see plants more easily and it’s more appealing than a flat landscape.
You can see in the picture below I added about 10” of compost to raise these beds. If you’re on a tighter budget than don’t go too crazy with this step. But anything you can do to avoid creating a completely flat bed will be a help.
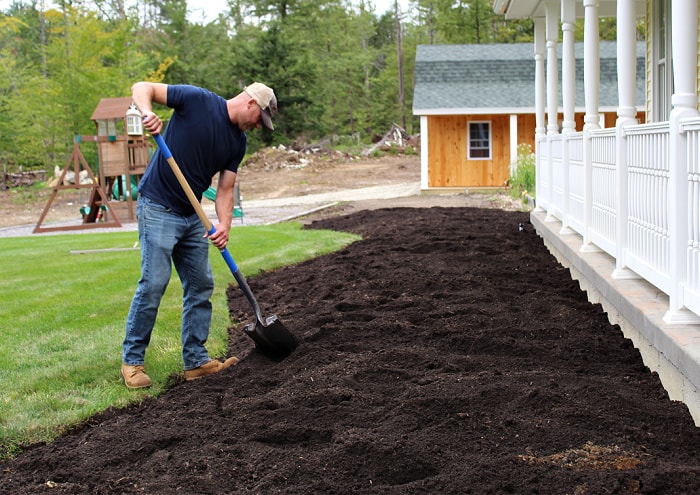
The compost will also come in handy later as you dig in plants. Perennials and annuals will go right into this compost layer. For shrubs and trees you’ll be incorporating this new compost into the existing ground when you dig the holes for planting.
If compost is expensive by you, another option is to get a loam/compost mixture. Over in my area a lot of material yards refer to this as ‘super loam’.
4. Landscape Fabric or No?
This next step is where you would install landscape fabric, if you want to. Personally I no longer install landscape fabric under mulch. Back in the day, there were several years where I always installed it. But knowing what I know now, you’re better off leaving it out. Check out the full explanation here: Should I Use Landscape fabric?
5. Pick and Purchase Plants
Choosing what to plant can be very challenging for a typical homeowner. But if you’re trying to get through a foundation planting then you may be surprised what you can put together. I’m by no means a designer but I can usually get by on planting a decent bed by sticking with some basic steps:
– Start with trees or large shrubs to frame the house.
Go back to your sketch and locate where you want to put trees, or large shrubs. Planting a tree or larger shrub on both sides of the house is usually a great place to start. This will help frame the house. At this point don’t even worry about what kind of tree or shrub you want to plant. Usually I’ll call out on my plan that I want either an evergreen plant, or deciduous, but I’m not worrying about species yet.
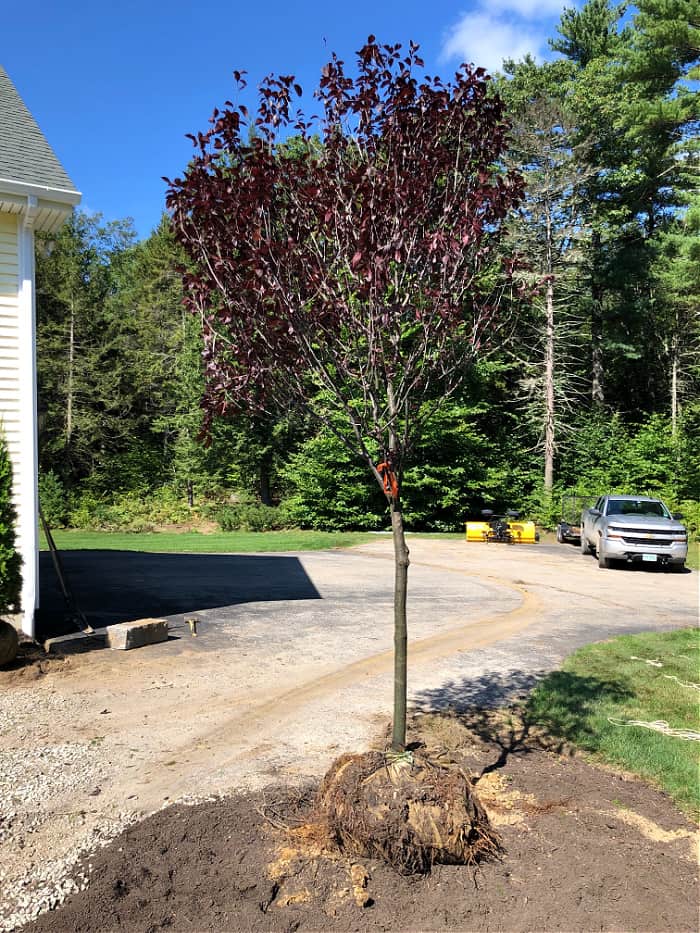
– Add specimen trees or shrubs.
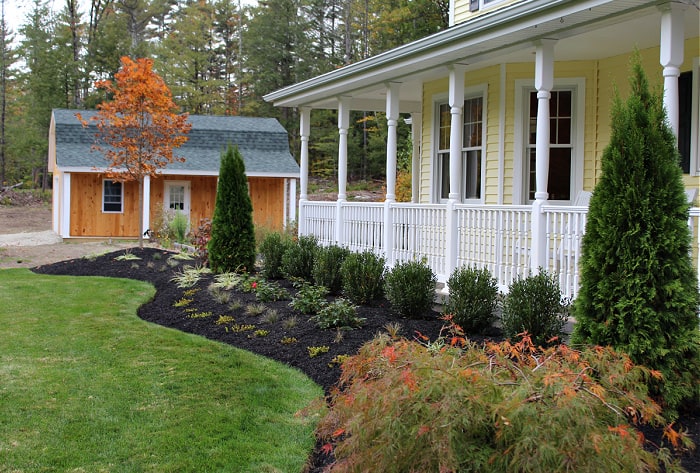
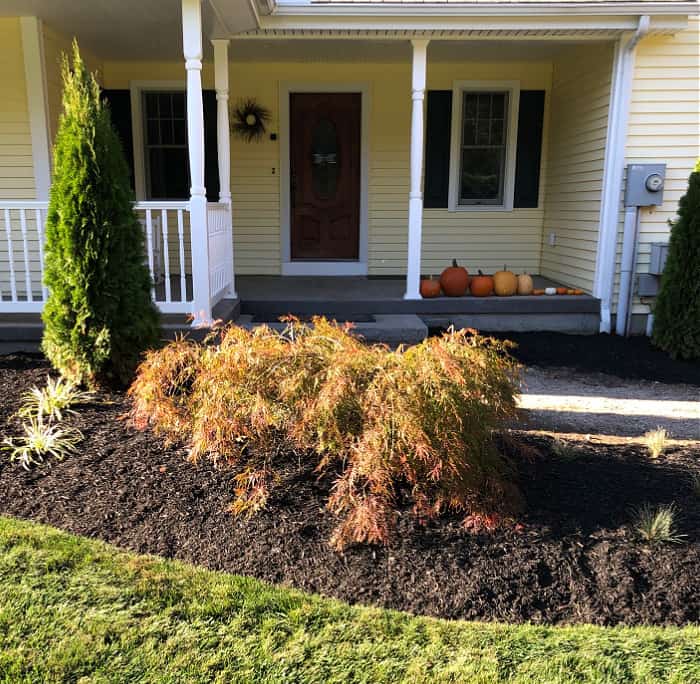
Once you have your house framed, add specimen trees or shrubs to your plan. This is usually one specific tree or shrub that will be put in a location that will stand out. It won’t be as big as the trees I used to frame the house, but it’s a one off planting that is special. Check out this weeping maple below. This is a perfect specimen right in front of my entry.
Again, you don’t have to call out a species yet, just write the word specimen on your plan. Also, if you can’t visualize where a specimen planting should go then by all means leave it out. Keep things simple if you are just starting out. You can plant a great landscape by keeping things simple.
– Add shrubs along house.
After you’ve framed your house, and placed a specimen tree/shrub if you chose to do so, it’s time to start thinking about shrubs that will be planted in multiples along your house. These will be planted in masses (meaning greater numbers).
These shrubs are medium sized and should be evergreen as much as possible since it’s nice to have leaves all year covering the foundation part of the house. Since most homes are often split by a front door, creating a left and a right side, you may choose to plant 2 different types of shrubs for these areas. One shrub type can go on the left side for example and another can go on the right.
For these medium sized foundation shrubs I would stick to one or two varieties and no more. Take a look at the picture below. These inkberry hollies are planted in a quantity of 10 on the left side of the house, and I also have them again on the right side. Repetition is good, it’s easy on the eye. Too many varieties can look too busy.
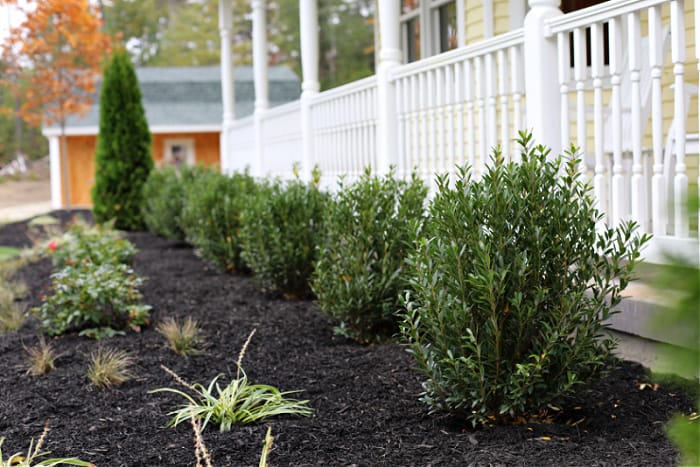
Once again, for planning purposes just pencil in ‘medium evergreen shrubs’ on your plan. You don’t have to be specific yet unless you want to.
– Add perennials, small shrubs, annuals, or groundcover.
Lastly, fill in the middle to front section of the landscape beds with either perennials, small shrubs, annuals, or groundcovers or a combination of some. Don’t get carried away here. Stick to a general theme and repeat it.
Again, I want to emphasize the point that you should keep your written plan simple.
There are 3 reasons I like to keep this all surprisingly vague until I get to the nursery. One reason is, like most people, I struggle to create on paper. I always draw a blank when it comes to plant species and when I walk through the nursery it’s like having a big plant index to choose from.
Secondly, the way things are these days, it’s so hard to rely on specific plantings to be available. I’ve seen so many landscape designs with half the plant list coming back as substitutions. There are shortages of plant material all over the place so you’re only as good as what’s in stock anyway.
Lastly, the creativity flows better when you’re at the nursery or garden center. Nurseries and garden centers are great places to get inspiration. That’s why I like to go in there with ‘half a plan’. Knowing just the basics of what you want to do with your rough landscape plan should be more than adequate.
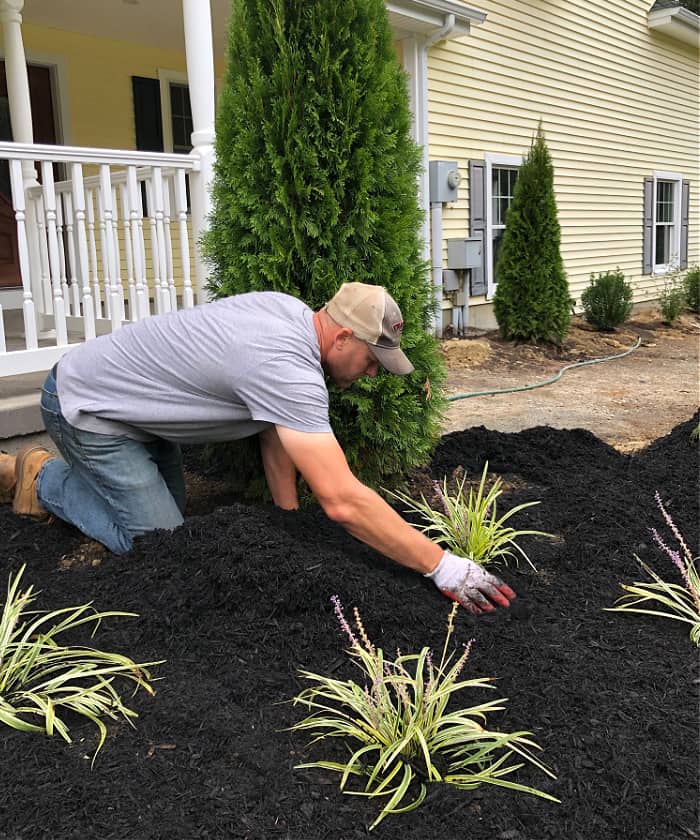
6. Place the Plants
Chances are you won’t be able to get everything you need in one trip to the nursery. That’s fine! Stick to the plan and try and get the trees first. Then the shrubs. Then the smaller stuff. Place everything where you would like them to go before planting in the ground. You’ll be surprised how placing even just one tree, or large shrub will help you visualize everything so much better. Take a look at the pic below where I’m placing the trees before planting them.
7. Dig In Plants
Once you have all your plants placed, it’s time to mark their location, shift the plant out of the way, and dig the plant in the ground. Once again, start with the large trees and shrubs first. Then medium shrubs, then the smaller filler plants.
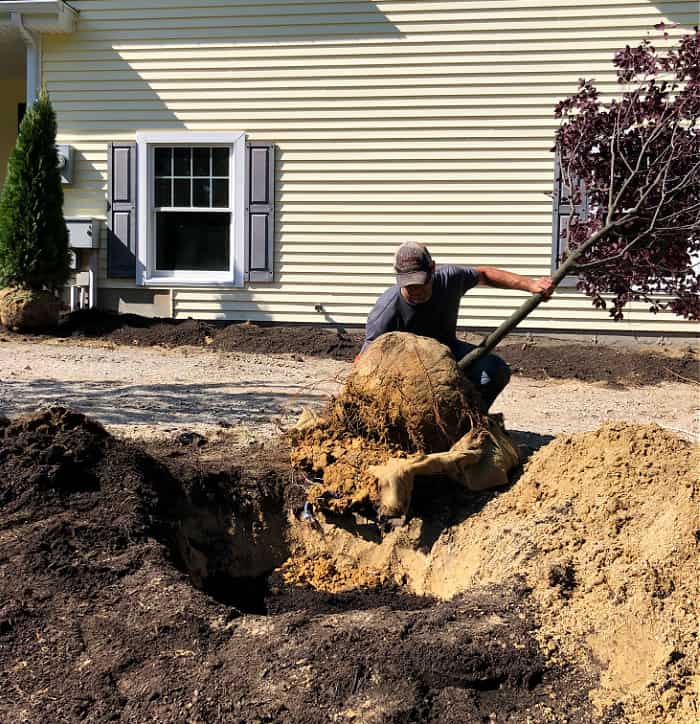
When digging in trees and large shrubs I like to make sure the hole extends at least 10” larger than the circumference of the root ball. If I’m in really bad soil like the pic below, then I’ll make it extra wide and deep so I can mix in more compost to amend the soil. As you backfill, make sure your lightly packing in the soil to get rid of air pockets and make good contact with the roots.
For smaller shrubs and perennials try to make each hole twice as wide as the root ball or container but don’t dig too deep. The depth should be about the same height as root ball or container. Burying too deep can actually damage the plant. Again, as you backfill, tamp down on the soil around the plant. If you added fresh compost to the entire bed like I did then you don’t have to dig such wide holes.
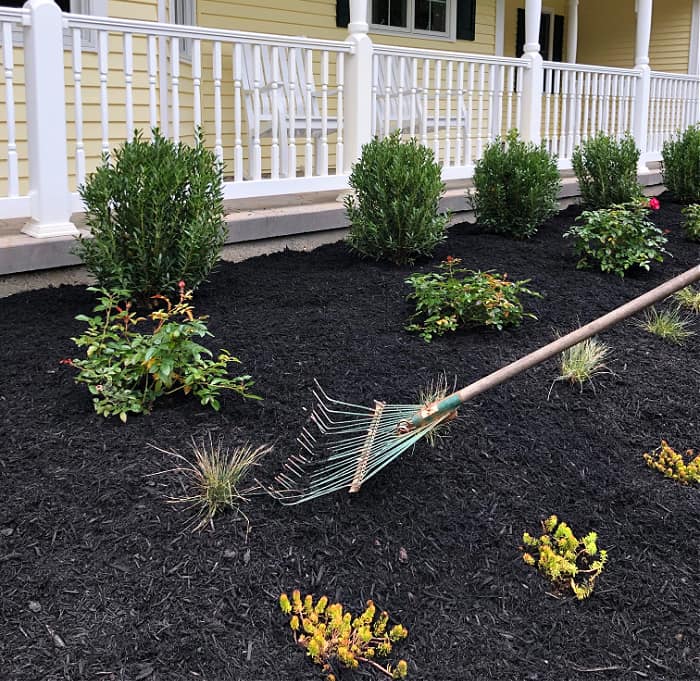
8. Mulch
Once all plants are dug into the ground, take a lap around the planting bed with a garden rake to get everything smooth again. Clean up any mess left behind from planting. You may also need to re-establish your edge at this time if loose soil is encroaching on it.
Finally, apply 3” of bark mulch to the landscape bed. I use a pitchfork to shovel the mulch into a wheelbarrow. A pitchfork is definitely easier than a shovel!
Dump several small piles of mulch wherever there is space to, being careful not to damage plants.
Once all the piles are in place, use either the pitchfork or your hands to gently place the mulch around plants. For larger, more open sections, use a metal garden rake.
Be careful to prevent mulch from pushing up against your edge. You want to keep that edge a couple of inches thick so don’t let mulch pile up along it.
Lastly, go around with a leaf rake and turn the rake so it is upside down. Drag the rake around to knock down any clumps and smooth the mulch out as much as possible.
9. Water
Water immediately after mulching! Mulch can be very hot when it comes fresh from a pile. It’s important to water the entire mulch bed to cool it down. Then, water each individual plant.
I highly recommend you remove any nozzle from the hose and just set the hose to the base of the plant so water can slowly trickle down to the roots.
Move the hose several times around the base of the plant so that every part of the root system gets wet. Stick to this slow trickle watering everyday until plants appear healthy and starts to put on new growth. If it’s fall, continue watering late until the season. Usually until there’s been a couple of frosts and temps aren’t spiking in the middle of the day.
Check Out These Posts Next
Join my free email list!
Thanks for the tips Mark. Perfect timing, I just moved into a new house and the builder installed tiny little shrubs. I’d like to add more of a mix of trees, and some medium sized shrubs with maybe some perennials like you described. Thanks again!
You’re very welcome Jorge! Happy to hear you’re able to apply some of this to your new landscape. Good luck!
I cannot tell you how helpful this step-by-step guide is. I purchased a new home four months ago. I have been working diligently to remove the overgrown plants and shrubs that have totally taken over my front yard. I am at the point now where I am ready to plan and begin landscaping from scratch. To be honest, I had no idea where to begin. I love the way you kept things simple and I ADORE the idea of using a garden hose to create a visual of what my plan might look like before I start digging. Your tips are so helpful!!! I feel so much better going to the nursery with a “half a plan” like you said. I can’t thank you enough for this help!!!
Thanks so much MaryBeth! I’m so happy to hear you found this helpful. Have fun planting the new landscape!
I had the most strangest hole that some creature made in one of my maple trees in front of my house it is a 2 inch hole and goes like at least 2 to 3 inches deep into the branch on the tree any Ideas what it could be?
hmmm, that’s a tough one. It could be a woodpecker looking for food.
Hey! I love your blog. Wanted to ask a few questions:
1- can you build up a plant bed with topsoil instead of compost?
2-do you do anything to kill the existing grass before establishing a new landscape bed? Or do you just put the compost and mulch thick on top to kill it?
3- I have a tree and 2 shrubs already planted in my front yard. I wanted to turn that spot into a landscape island and beef it up. Is it possible to build up the space so that it’s not completely flat when there are 3 existing plants already there?
Thanks for your help! Landscaping can be so confusing when your’re starting out.
Hi April!
1) I’d really opt for compost instead. It’s way more nutrient rich and your plants will love it. Top soil is funny. You can get good top soil, but you can also get bad top soil. If you buy it in bulk from your local garden center it’s most likely just the top layer of the soil that’s been scraped off a construction site. For top soil I trust bagged material much more, but overall would try and use compost.
2) Thanks for bringing this up since this was missing from my post and I just updated it to cover my thoughts on it: If you are creating this bed in an area where there is grass then it’s best to remove the grass over the entire area. If the area is small enough you can do this with a flat edging shovel but for a larger area I’d recommend using a sod cutter. If you really didn’t feel like doing the work of removing the existing grass you could spray the area with a non selective herbicide such as Roundup. This should be done at least a week before installing your landscape bed so the grass has time to die. If using this method then adding a thick layer of compost as described in the next step is very encouraged. Chances are you’ll have to dig through the grass layer when digging in your plants so just make sure you dig a wide hole and add compost inside the hole to help the plant get established.
3. If you have three plants that you’re looking to keep then you’re pretty locked in in terms of height. Depending on how large the area is you could mound up some sections and leave others flatter where the existing plants are. This can actually look very natural if done right. Feel free to send me some pics via email and I can check out the area and give you better guidance! [email protected]
Does creating a mound or a raised planting bed help with drainage?
Yes if you bring in compost and plant in that it’s going to be much better for your plants if you have poor drainage. Before bringing in the compost though I would work on doing what you can to break up the existing top layer that is poor drainage. This way you’re not only bringing in better soil, you’re improving the existing soil. And if you’re digging in large trees and shrubs make sure you dig out plenty of the poor soil and add compost directly to the hole.
What are the tall evergreens you choose to use called
These are Dark Green American Arborvitaes.