
Digital Decorating is such an easy way to add a bit of magic to your usual holiday lighting display.
The Clark Griswold in us always wants a holiday display that’s bigger and better than everyone on the block. Every year I scroll through the internet to check latest trends and see what I can do to add a little extra to the holiday lights. One year I came across something called Digital Decorating, and it was the ultimate game changer. My daughter went absolutely crazy over this. She was convinced that there was magic happening inside the house. The crazy thing is Digital Decorating is actually super easy, anyone can do it!
What Is Digital Decorating
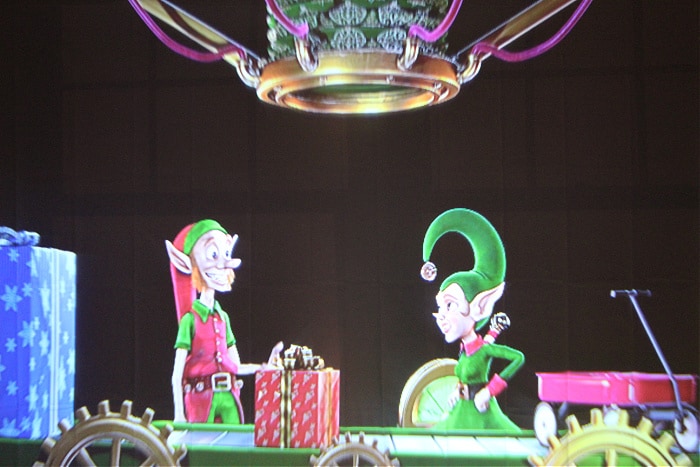
Digital Decorating is when you use a projector to project an animated video or image onto a wall, door, house, etc. That may not seem like anything new, but the real magic is when you shine an animated video through the window from the inside of your house, so it can be seen on the outside. Rather than try and explain the effect, take a look at this quick video so you can see what it looks like:
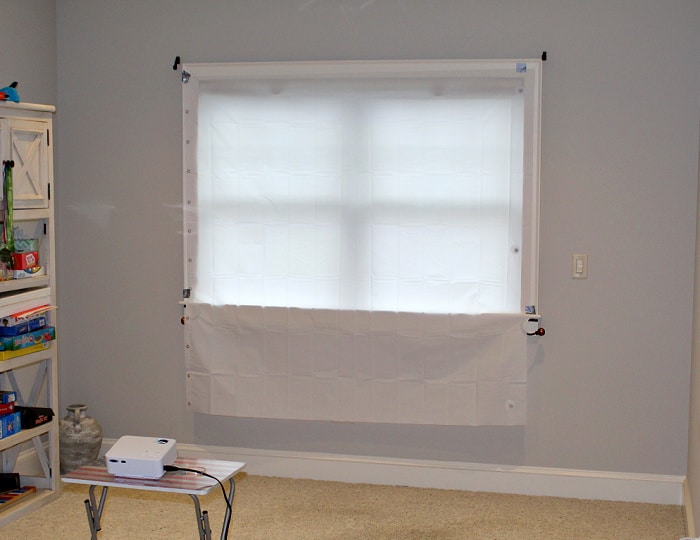
So what exactly are you seeing in this video? You’re seeing a small projector project a short Christmas movie clip through a shower curtain that’s hanging on the inside of a window. The best part is you can purchase these short clips from a company online (I’ll link to them below). Once purchased, you save them to your computer and then save them to a flash drive or SD card and you can play the clips on your projector. Take a look at the pic below of what this looks like on the inside of your home:
Another great part about this is this doesn’t just apply to Christmas. Digital Halloween Decorations are just as popular and the animated videos related to Halloween can be purchased as well. There are also several other holiday options.
What Materials Are Needed
1. Digital Decorations Download
My favorite site for purchasing the short animated movie clips is by far AtmosFX. They have large collection to choose from and several different themes. You get to watch the clips before you purchase and download them so there are no surprises.
2. Flash Drive
I recommend downloading the animated movie clips onto your computer first, unzipping the files, and then downloading them to a Flash Drive that will be inserted directly into the USB port of your projector. Make sure your projector has a place to insert a Flash Drive. Most of the time they do, however yours might accept an SD card instead. Usually you can even plug in through a USB port directly to your computer or to your phone, but than you’d have to dedicate that device solely to the projector every time you want the decorations to display which may not be practical. You may even be able to connect via blue tooth from a phone or device if your projector has the capability. There really are a lot of options but I usually go with an SD Card or flash drive.
3. Mini Projector
You don’t need to invest in an expensive projector. I recommend going onto Amazon and looking around. Their projector options change a lot but I have something similar to this mini projector. Don’t forget, projectors can be used for much more than digital decorations. A lot of times you can project TV shows, movies, or anything you have on you phone or laptop onto a wall or projection screen in your house. Sometimes during holiday parties I actually like to download an animated snow storm scene and project it onto the wall in one of the rooms in the house. It’s always a cool effect that the kids and adults talk about!
4. Cloth
The last thing you will need is a slightly transparent piece of fabric that the light from the projector will pass through. If you were to just shine the projector through the window the light would shoot everywhere and you wouldn’t see anything from the outside of the house. Instead, you need to cover the inside of your window with some kind of fabric. I have found the best thing for this is a frosted shower liner. You should also be able to use a very light weight, white sheet but I have found a pretty medium frosted shower liner produces the best picture.
How to Set Up Digital Decorations (Step By Step)
1. Download Videos
Start by going to AtmosFX and purchasing and downloading your favorite movie clips. Download them straight to your computer, then onto a Flash Drive of SD Card.
2. Cover Your Window
Hang the frosted shower liner or sheet over the window, on the inside of the house. I like to use small push pins or tape to hang the liner or sheet.
3. Setup Projector and Adjust
Setup your projector on a small table or stand about 8-10 feet away from the window, with the projector pointing at the window. Plug the projector in and play with the knobs to adjust the size and focus of the display screen. If you’re doing this during the day you probably won’t see any image since there is too much light. So you’ll need to turn the projector onto a near by wall and shut the lights off in the room to adjust the projector settings. Read the manual that came with the projector to adjust settings and get familiar with how your specific projector works. Enter the Flash Drive or SD Card, etc, into the projector and use the remote or buttons on the actual projector to navigate to where you have the animated downloads installed. In my case that is usually the USB port where I have the flash drive installed. Simply click on the movie you want to display and it should run continuously. You’ll have to wait until it’s dark to shine the projector through the window and actually see an image. Once it’s dark, make any final tweaks to the size and focus so that the image is fully over the window. You may need to move the table the projector is on when finding the perfect fit.
4. Enjoy!
Get the family outside to enjoy the magic going on inside your house!
Check Out These Posts Next
How to Install a Playground Border
Follow Me
Join my free email list!
That is absolutely the coolest thing ever! My little niece is going to go nuts over this! I can’t wait to see her face! It actually doesn’t seem that hard but thanks for the pics so I can visualize it before I try it. I’m going to get this going ASAP. Thank you so much for the tips!
You’re very welcome Henry! I can’t wait for you niece to see this, have fun!